Technical specification

With the POT 40 pneumatic oscillating tool various soft materials up to a maximum thickness of 27 mm can be cut, for example:cardboard, corrugated cardboard, sealing materials, rubber, carpet. laminated cellular materials, fibre reinforced materials, insulating materials, special woven fabrics etc. etc. The oscillating toot can be fitted into the Tz module of the different tool heads. 

Tz module stroke:32mm
Stroke frequency:11.000/min
Stroke:8mm
Air requirement:300 - 400 l/min approx.
Operating pressure:8 bar
Knife types:Type Z16 / HTZ-016
Type Z17 / HTZ-017
Type Z20 / HTZ-020
Type Z21 / HTZ-021
Type Z22 / HTZ-022
Type Z25
Type Z26 / HTZ-026
Type Z28 / HTZ-028
Type Z29 / HTZ-029
Type Z40
Type Z41 / HTZ-041

Fitting the knife

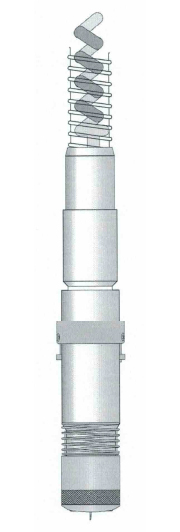
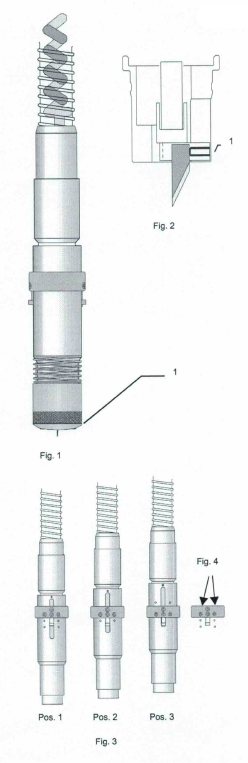
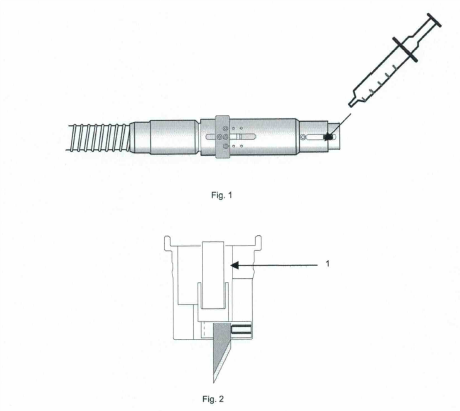
1. Remove the gliding shoe (Fig. 1/1), undo the hexagonal socket screw (Fig. 2/1) with the 1.5 mm Allen key supplied with the unit, insert the knife and re-tighten the screw.

2. Replace the gliding shoe.

3. Insert the tool in the head. The red marking on the tool must be aligned with the marking on the head. Close the bayonet catch.

4. Initialising the Tz head (1184) – see Tz head operating instructions. Because the knife oscillates, the depth can only be correctly set while the tool is running. The tool starts to oscillate if the pen key is pressed during initialising. The stop ring on the tool must be set according to the thickness of the material

(maximum depth of cut). Three positions are provided for this stop ring (see Fig. 3).

Depth of cutPosition 
10 mmPos. 1top
11-23 mmPos. 2centre
16-27 mmPos. 3bottom

In each case, the length of the knife has to be adjusted to the material to be cut.

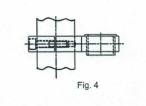
To set the stop ring, undo the outer screws on the ring (Fig. 4), slide the ring to the desired position and then re-tighten the screws.

Maintaining and lubricating the tool

The compressed air supply to the POT must be cleaned, regulated and mixed with lubricant (oil). A maintenance unit is installed on the plotter for this purpose.

The following should be checked daily:

- Drain off collections of water, by pressing the valve button on the under side of the observation glass. If too much water collects in the separator, it can penetrate the tool through the oiler. This would lead to damage to the tool.

- The operating pressure can be set by turning the black hand wheel on the pressure controller. Operating pressure should be about 8 bar. If the pressure is only about 6 bar, problems with starting up can arise when the tool is initially started.

- The oil level in the oiler observation glass must be within the marking. The tool should not be operated without an oil supply as this would lead to damage to the tool.

Filling with oil and setting the quantity

The POT must always be lubricated during operation. For this. the oiler must be set as follows:

- fill the oil tank with the oil supplied with the unit

- unscrew and remove the transparent plastic part on the oiler and fill,

- or

- fill the syringe supplied with the unit with oil, undo the screw (Fig. 8/1) and fill the tank.

Setting the oil quantity

- turn the inner screw (Fig. 8/2) clockwise fully to the stop and then turn anti-clockwise by about an eighth of a turn. This should pre-set a quantity of about 1 drop per day

Open the stop valve.

- start the plotter

- set the compressed air supply for the POT to 8 bar

- press the pen key - the POT starts

- check the quantity of oil in the oiler regularly and top up as necessary the setting must be checked if no oil is used up over a long period of time.

The POT must not be used without oil.

Failure to observe these instructions can lead to damage to the tool.

The knife holder guide should be lubricated with the grease supplied with the unit about every 25 operating hours (Fig. 1).
The round knife holder shaft (Fig. 2/1) should be greased at the same intervals with slideway oil (supplied with the plotter).

POT 32/40 Installing / Retrofitting

Generally

With the POT pneumatic oscillating tool multi-layered corrugated cardboard up to a thickness of 12 mm can be cut at a speed of up to 30 cm/s (18 m/min). Depending on its composition, solid cardboard from 3 to 4 mm in thickness can also be cut. Apart from cutting cardboard, the tool is also suitable for cutting various sealing materials such as, for example rubber, caoutchouc etc., as well as carpeting. various synthetic fibres, fibre reinforced materials and various woven fabrics. The oscillation tool is mounted in the Tz type head or in a modified TP type system tool head with an extended stroke of 20 mm. This head is called the TsP type. The type T head can also be used for materials with a thickness of up to a maximum of 4 mm.


Stroke frequency:

12,000/min approx.

Stroke:

7-8 mm

Air requirement:

400 l/min max.

Operating pressure:

8 bar approx.

Knife types:

Type Z20 / HTZ-020

Type Z21 / HTZ-021

Type Z22 / HTZ-022

Compressed air:

400 l/min at 8 bar approx.

Included in delivery:

- POT tool with air hose (8 mm) and outgoing air hose

- Silencer with holder

- Tool holder

- 1 set of knives

- Maintenance unit for POT

- Connecting cable

- 0.5 litre ASEOL Plus 16-106 oil

- 1.5 mm Allen key

Installing

1. Mount the gantry holder on the right hand foot (Fig. 1).
2. Assemble the sections of the gantry, draw in the hoses and fit the gantry into its holder.
3. Insert the POT into the head and connect the hoses. Arrange the hose so that the head is able to move to every table position.
4. Pull the compressed air hose (black) through the plastic angle piece on the silencer and draw taut until the compressed air hose spiral is lightly under pressure. Secure the black hose against slipping back with the hose clip delivered with the unit (Fig. 2/1).
5. Press the outgoing air hose onto the silencer and tighten the hose clip (Fig. 2/2).
6. Mount the silencer (Fig. 2) at the lower end of the gantry.

7. Connect the compressed air hose to the maintenance unit (Fig. 3/1).
8. Insert the plug into the solenoid valve (Fig. 3/2).
If being fitted retrospectively, the cable must be connected to the option board (Fig. 3/3).
9. Mount the tool holder (Fig. 4) on the inner side of the gantry above the bow. If the oscillating knife is not in use, it may be left here safely without having to disconnect the hoses (Fig. 1 /1).

Maintenance unit Figs. 5 and 6.

1 Compressed air connection
2 Stop valve
3 Water separator
4 Pressure controller
5 Oil tank
6 Connection to POT
7 Filler screw
8 Observation glass for judging the quantity
9 Oil level setting
10 Connection to option board
11 Syringe for filling with oil

Pre-setting the quantity of oil

The POT must always be lubricated during operation. For this, the oiler must be set as follows:
- fill the oil tank (Fig. 5/5)with the oil supplied with the unit
- unscrew and remove the transparent plastic part on the oiler and fill,
or
- fill the syringe supplied with the unit with oil, undo the screw (Fig. 6/7) and fill the tank.
- pre-set the oil quantity with the adjusting screw (Fig. 6/9)
- turn the inner screw (Fig. 6/9) clockwise fully to the stop and then turn anti-clockwise by a maximum of an eighth of a turn. This pre-sets a quantity of about 1 drop per hour
Open the stop valve (Fig. 5/2).
- start the plotter
- set the compressed air supply for the POT to 8 bar
- press the pen key - the POT starts
- check the quantity of oil and adjust if necessary


The POT must not be used without oil.
Use only the oil supplied with the unit.


Failure to observe these instructions can lead to damage to the unit.

Fitting the knife

- Remove the height adjustable gliding shoe (Fig. 7/1).
- Undo the hexagon socket screw (Fig. 8/1) with the 1.5 mm Allen key supplied with the unit, fit the knife and re-tighten the screw
- Replace the gliding shoe. This cannot be wrongly fitted because of the guiding groove in the tool corresponding with the pin in the gliding shoe.

Types of knives supplied with the unit:

1) 910 313 type Z20HTZ-020 HM knife single edged, 5°/25° angled 25 mm long for corrugated cardboard up to 9mm
2) 910 314 type Z21HTZ-021 HM knife single edged, 5°/25° angled 28 mm long for corrugated cardboard up to 12 mm
3) 910 315 type Z22HTZ-022 HM knife single edged, 10°/25° angled 25 mm long for solid cardboard up to a maximum of 4 mm

Further types of knives are given in our separate accessories price list.

Please see the instruction manual for the tool head for details of inserting and adjusting the tool in the head.

POT 32 parameters when using a TsPT head

Because of the increased stroke of the TsPT (20 mm) or just to ensure that the POT has reached the necessary frequency before the knife enters the material for cutting, it is necessary to adjust the pen waiting times as follows:

Pen down waiting times:

before pen down

after pen down

100 ms

400 ms

Pen up waiting times:

before pen up

after pen up

100 ms

300 ms

These waiting times depend on the pressure set (for the up / down movement), on the pressure controller setting on the head, and on the thickness of the material. Acceleration similarly depends on the material (pre-set stage 1-2).

The pen waiting times do not apply when the POT 40 is used with the Tz head.

Product added to wishlist