Inserting knife:

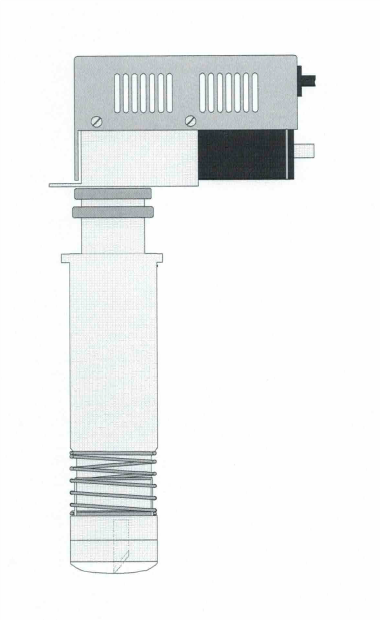
- Remove glider from EOT


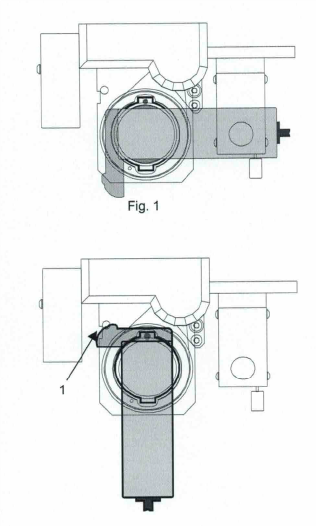
- Loosen Allen screw of knife holder (Fig. 1/1)


- Insert knife into slot of knife holder


- Tighten screw (Fig. 1/1)


- Attach slipper


- Loosen fastening ring


- Turn adjusting screw until knife and slipper are in the same vertical position. At the same time ensure that the knife is in its lowest position by turning the motor shaft via handwheel (Fig.2).


- If knife and glider are in the same vertical position (Fig. 3) secure with fastening ring.

Inserting oscillating tool into head

- EOT motor must be parallel to bar (Fig.1).

- Place red point of EOT to red point of head and insert tool into head.

- Hold lower ring of bajonet catch and turn upper ring in clockwise direction.

- Turn EOT (upper part) into front position until pin is in notch of tool (Fig. 2/1).

- Insert plug into socket (left of head carriage).

- Adjust Z-axis acc. to instructions.

- Set parameter and carry out test cut (<ESC>31).

- The frequency of the oscillating tool can be set to 2 steps. Menu function <ESC> 2222
Oszillating Tool Frequency High or Low.

- The frequency can be stored under "SAVE CONFIG" (<ESC> 46).

Upgrade / Installation on PN-serie (S/M/L/XL-Line and LC-1800)

Items:

EOT2 Box Print Item No. 991 274
2 distance pins M3x18mm, 2 M3x10 (Din 912) screws, 2 washers for Box Print
1 cable 991 281 (Y-Board to head) incl. attached metal case
2 M3x6 for so,cket case, 2 M3x4 countersunk head screws, 2 cable tie holder for screwing on, 2 cable ties
EOT-32 or EOT-40 for Tz-head

Note: for LC-1800 plotters a longer cable (total length: 570mm Item No. 991 282) must be installed. Moreover, another metal case is attached to cable 991 281.

Electronic components of the tool are damaged if the EOT32/40 is used with "EOT-BOARD, Item No.: 991 190"!

- Connect EOT2 Box Print in elektronic box to amplifier, optional plug S6.
- Remove cover of beam. Remove Y-Board as much as necessary. Install cable 991 281.
Insert 10-pin plug into 82 of Y-Board.
- for LC1600: Remove metal cover behind head attachment. Remove Y-Board. lnstall cable 991 281. Insert 10-pin plug into 82 of Y-Board.
- Install plotter again and switch on.
- Activate EOT in menu (<ESC> 2222 Link to Tool = Tool No.) and test with Pen down.
- Save settings with SAVE USER (<ESC> 42)

Upgrade / Installation of EOT32 on P-series + LC-1400

Items:

Tool-Amplifier Board ex Rev. D, Item No. EOT-32 P-series

Variant with supply cable via gantry
If an EOT of the first generation was already used with the table the existing cable routed via gantry to the head can still be used on.

Variant with supply cable via cable ducts
lf the plotter is not equipped with a "gantry" a flat cable can be pulled in. Wiring is a costly and time-consuming process and should therefore only be carried out on customer's request. For service reasons the flat cable is separated by two connectors.
First separation point: before cable is routed to the bar. Second separation point: shortly before the cable is connected to the Lerno plug (EOT old series).

Procedure
- Install/replace Tool-Amplifier Board.
- Switch on plotter, Pen down -> Measure polarity on 3-pin Binder socket.
Nominal voltage approx. 25V between Pin 1 (plus) and Pin 3 (minus). Otherwise, connection of WeidmOller socket must be changed.
- Connect EOT and carry out a test

Service description

In the following sub-sections you can find brief descriptions how different customer-installed plotters must be modified if a EOT32 should be used. The modifications may only be carried out by a trained service technician.
In case of an electronic system failure the EOT must be returned to Zünd.

Check list in case of fault:
EOT correctly installed (<ESC> 2222 = 1) and stored (<ESC> 46) in plotter software?
Box-Board, item no. 991 270 within the electronic box inserted to Amplifier S6?
Electronic components of the tool are damaged if the EOT32/40 is used with "EOT-BOARD, Item No.: 991 190"!

The knife is not moving or only very slowly:
    Indicates a mechanical failure. When the EOT is not activated I not switched on. It should be possible to move the knife via shaft on end of motor without efforts. Current of motor amplifier is electronically limited. As a result the nominal speed is only achieved with smooth running mechanical parts. The same effect can also appear due to a cable interruption of the motor supply. -> Check cable for damage around housing.
Motor running but knife not moving:
    Faulty mechanical parts.
EOT correctly in.stalled but motor not running:
    Check connections to LEMO-socket of plotter:

Front view of Lerno-socket of plotter.

Oszin:    no level
OszOut:    speed= high-> 5V, speed = low-> OV
OszOn:    Pen down -> 5V, Pen up OV

Note:
The metal case with its mounted Lerno socket may be not in direct contact with the Lerno case. Earthing of case and Lerno case are connected with each other in the electronic box. That is why this can only be checked if the Box-Print is not inserted or if the supply cable is not plugged into the Y-Board.

Product added to wishlist